Click here to purchase MarketShip!
Minimum Requirements
MarketShip requires PHP 7.1+, WooCommerce 3.5.0+, and one of the following plugins:
-
- Dokan 2.6.0+
- WC Vendors 2.0.0+ and WC Vendors Pro 1.5.4+
- WCFM Marketplace 3.4.0+
Installing MarketShip
To install MarketShip:
- Log into your WordPress site.
- Go to Plugins > Add New.
- At the top of the screen, click Upload Plugin.
- Select the .zip file sent to you in your Purchase Confirmation email. You have two options:
- Click Browse. Find and select the plugin .zip file.
- Drag and drop the .zip file onto the Upload Plugin screen.*
- Click Install Now.
- When the installation completes, click Activate.
* Drag and drop will only work if your browser supports it!
Activating Your License
To benefit from future updates to MarketShip, you must activate your license key. To do so:
- Log into your WordPress site.
- Go to Plugins.
- Find the row for MarketShip.
- Click activate license.
- Enter your license key, which was delivered along with your download.
- Click Activate.

Connecting to Shippo
In order to use MarketShip for live shipping rates and label printing you will need to connect a Shippo account to your marketplace. The two methods of connecting a Shippo account to MarketShip are documented in this section.
Method 1: Use an API token
If you plan to let vendors use your own Shippo account to calculate live shipping rates and purchase shipping labels, then all you need to do to connect to Shippo is generate an API token and enter it on the MarketShip settings page. Please see “Connecting MarketShip to Shippo with an API Token” for step by step instructions.
Method 2: Use OAuth
If you will be allowing your vendors to connect their own Shippo accounts to calculate live shipping rates, purchase shipping labels, or both, you will need to obtain OAuth credentials from Shippo and enter these values on the MarketShip settings page. Please see “Connecting MarketShip to Shippo with OAuth” for step by step instructions.
Configuring MarketShip
MarketShip can be tailored to your marketplace’s needs with the options available under WooCommerce > Settings > Shipping > MarketShip. These options are documented below.
Features
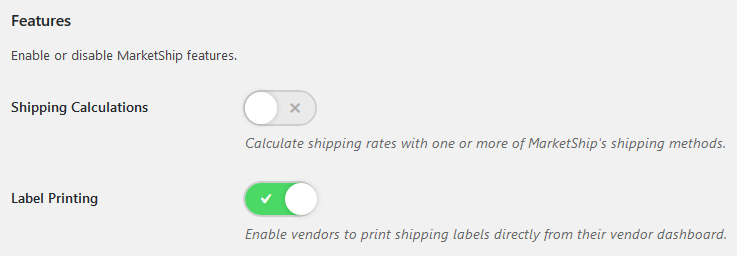
The toggle switches under “Features” allow you to easily enable or disable core MarketShip features. Enable Shipping Calculations to let vendors use MarketShip’s shipping methods to calculate shipping rates for their products, and enable Label Printing to allow vendors to purchase and print shipping labels from the vendor dashboard.
Shipping Calculation Settings
When Shipping Calculations is enabled, settings specific to shipping calculations will appear on the screen.
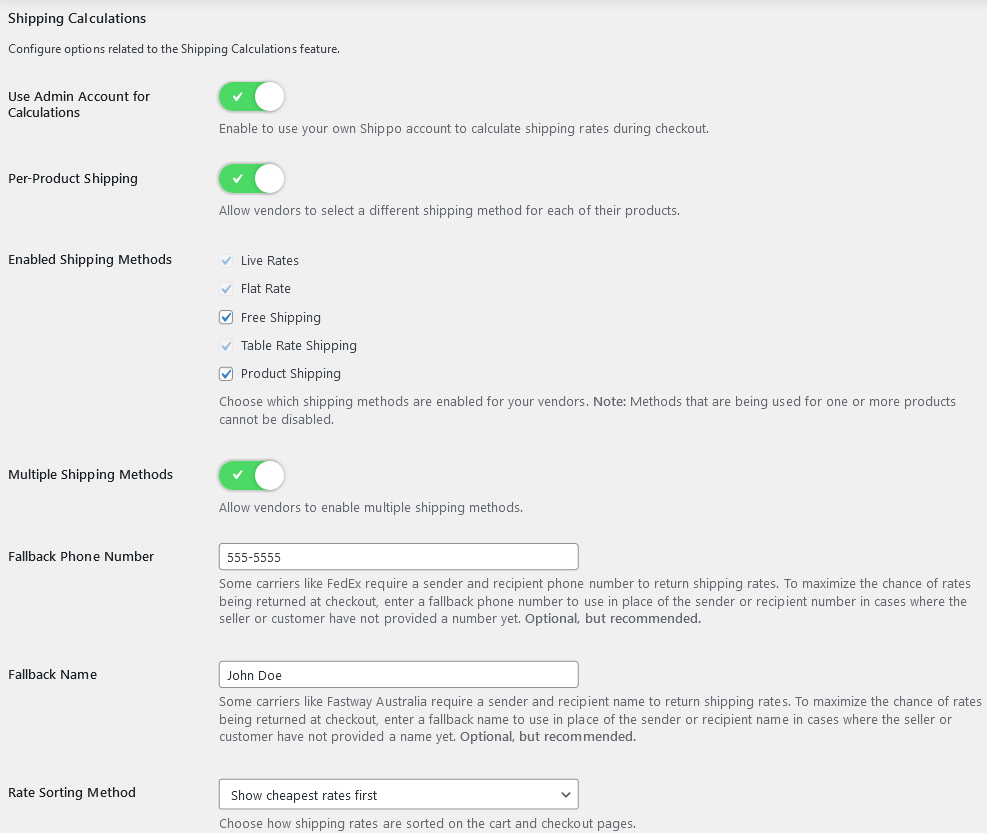
The available settings are:
- Use Admin Account for Calculations – Enable to use your Shippo account to calculate live shipping rates during checkout. Vendors will be able to select from the carriers you’ve set up in Shippo on the Live Rates settings page, so if you’ve set up UPS and USPS and a vendor only wants to ship via USPS they can do so. Note that your account will only be used to calculate shipping rates at checkout – vendors will still have to connect their own Shippo account to purchase and print shipping labels.
- Per-Product Shipping – Enable Per-Product Shipping (PPS) to let your vendors choose a different shipping method for each of their products. Leave it disabled to force vendors to choose a single shipping method for all of their products.
- Enabled Shipping Methods – The shipping methods selected in this list will be available for vendors to use. For instance, if you select Live Rates and leave all other shipping methods deselected, vendors will only be able to use the Live Rates shipping method. By default all shipping methods are enabled.
- Multiple Shipping Methods – Enable Multiple Shipping Methods to let vendors use multiple shipping methods. This is the default behavior starting with MarketShip 5.1.
- Fallback Phone Number (Live Rates) – This setting appears when the Live Rates method is enabled. The phone number you enter here will be used in place of the sender or recipient’s phone number if either is unavailable when calculating shipping rates at checkout. We highly recommend that you enter valid phone number here, especially if your vendors will be using shipping carriers like FedEx that require a number to return rates.
- Fallback Name (Live Rates) – This setting appears when the Live Rates method is enabled. The name you enter will be used in place of the sender or recipient’s name if it is unavailable when calculating shipping rates at checkout. We highly recommend that you enter your name here, especially if your vendors will be using carriers like Fastway, Sendle, or CouriersPlease that require a recipient name to return rates.
- Rate Sorting Method – Use this setting to control how shipping rates are sorted on the cart and checkout pages. Current options include “Don’t sort rates” (i.e. use the default sorting) and “Show cheapest rates first”.
Label Printing Settings
When Label Printing is enabled, settings specific to label printing will appear on the screen.
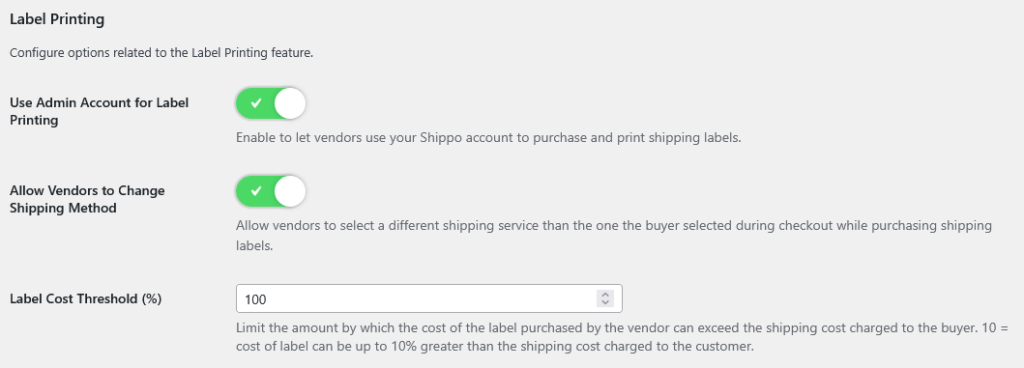
The available settings are:
- Use Admin Account for Label Printing – Enable to allow vendors to purchase and print shipping labels using your personal Shippo account.
- Allow Vendors to Change Shipping Method – By default, vendors are allowed to select a shipping service other than the one selected by the customer at checkout while printing a shipping label. Toggling this setting off forces vendors to use the exact shipping service selected by the customer.
- Label Cost Threshold (%) – This setting appears when “Use Admin Account for Label Printing” is enabled and controls the maximum percentage difference between the shipping cost charged to the customer and the value of postage that can be purchased by the vendor. For example, consider a situation where a customer is charged $10 in shipping for an order. In this scenario, if “Label Cost Threshold” is set to 10, the vendor will be able to purchase up to $11 in shipping labels (1.10 * $10 = $11). On the other hand, if “Label Cost Threshold” is 0 they will only be able to purchase up to $10 in shipping labels.
Email Notifications
MarketShip includes optional Shipment Notification and Delivery Confirmation emails that can be sent for orders shipped via Shippo. To learn more about how to enable and customize these notifications, please see “MarketShip Email Notifications”.
Shipping Products
MarketShip includes several flexible shipping methods for your vendors. This section describes how vendors can use these shipping methods to ship their products.
Configuring Shipping Methods
When Shipping Calculations is enabled vendors can configure the shipping methods for their store on the vendor shipping settings page. The settings page is located under Settings > Shipping in the vendor dashboard.

If Per-Product Shipping is enabled, vendors will be able to choose Default Shipping Methods for their products. Default shipping methods are used for all products unless different shipping methods are selected on the Edit Product screen. If Per-Product Shipping is disabled, vendors will be able to choose which shipping methods to enable for their store instead. In this case the selected shipping methods will be used for all of the vendor’s products.
If a shipping method has store level settings, a Configure button will appear next to the method description. Clicking this button will open the settings page for the selected shipping method.
Please consult the MarketShip Shipping Methods section of this document for a description of the MarketShip shipping methods and their settings.
Choosing the Shipping Method for a Product
When Per-Product Shipping is enabled, vendors can select a single shipping method for each of their products. The product shipping method can be set using the Shipping Method dropdown on the add/edit product screen. For Dokan users this can be found under Shipping and Tax, whereas for WC Vendors and WCFM Marketplace users it is located under the Shipping tab.
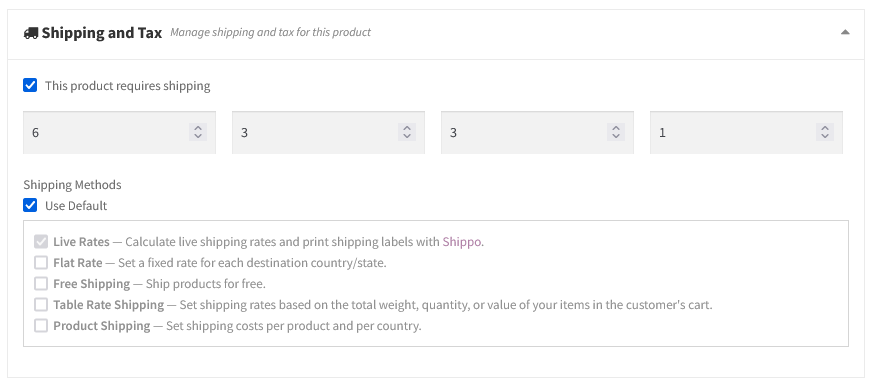
By default, all products use the Default Shipping Methods configured at the store level. The shipping method can be changed by unchecking Use Default.
If a shipping method has product level settings, new settings fields will appear when that method is selected. Continue reading to learn about the product level settings for each MarketShip shipping method.
MarketShip Shipping Methods
This section describes the MarketShip shipping methods and documents their product and store level settings (if any).
Core Shipping Methods
These shipping methods are provided by MarketShip and are always available regardless of which marketplace plugin you’re using.
Live Rates
The Live Rates shipping method calculates live shipping rates from multiple carriers with Shippo. It’s a great option for vendors who want to provide accurate, real time shipping quotes to their customers at checkout.
Store Level Settings
The Live Rates method has a number of store level settings, depicted in the screenshot below.
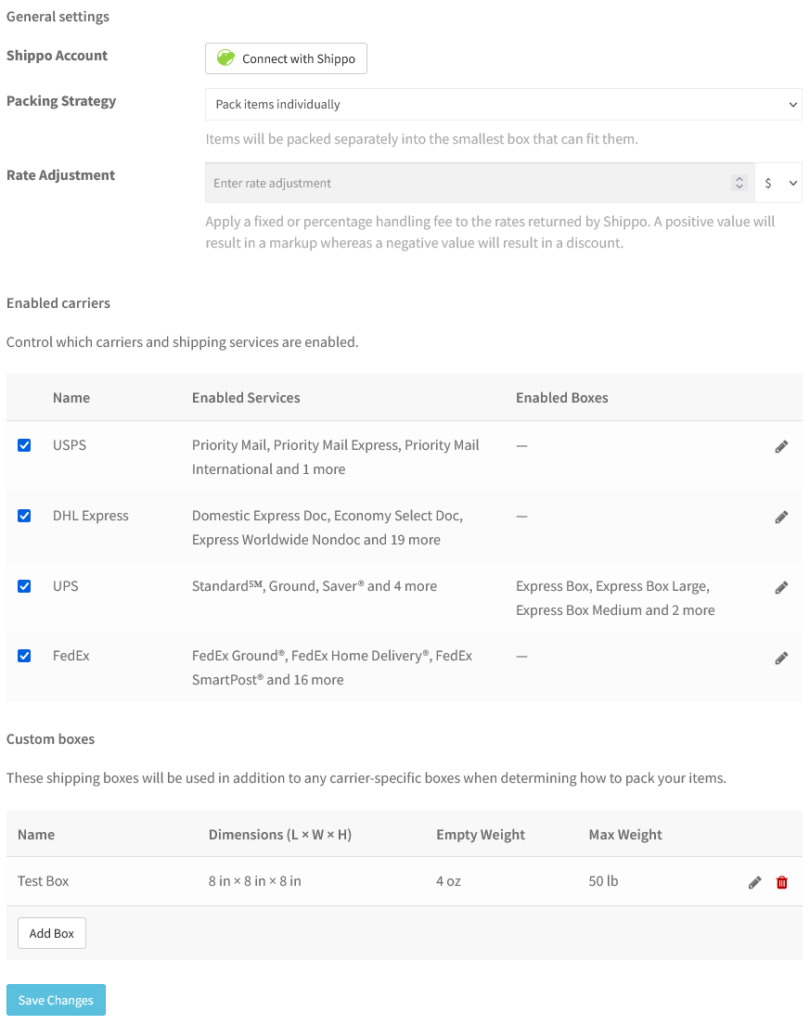
The settings are:
Shippo Account
Allows vendors to quickly connect or disconnect their Shippo account using Shippo’s OAuth Flow. If “Use Admin Account for Calculations” is enabled this option will not appear.
Packing Strategy
In order to provide accurate shipping quotes, the Live Rates method must pack the vendor’s items into one or more boxes. This option allows the vendor to control how their items are packed. There are two choices:
- Pack items individually – Pack each item separately into the smallest box that can fit it.
- Pack items together – Pack items into one or more boxes using the BoxPacker algorithm.
Pack items together will generally yield the most accurate shipping rates, but Pack items individually may be more appropriate for certain vendors.
Rate Adjustment
This gives vendors the ability to adjust carrier returned shipping rates up or down by a fixed amount or percentage. This can be used, for instance, to account for the cost of packing materials.
Enabled Carriers
The options in this section allow vendors to control the carriers and shipping services used to calculate shipping rates for their products. Carriers can be enabled or disabled using the checkboxes in the “Enabled carriers” table, and the enabled services and boxes for each carrier can be configured by clicking the “Pencil” icons in the table.
The carriers that appear in this list are populated from the connected Shippo account, either the admin’s account if “Use Admin Account for Calculations” is enabled, or the vendor’s account otherwise.
Custom Boxes
In order to pack the vendor’s items at checkout, Live Rates needs to know the boxes the vendor will be using for shipping. If the vendor has not enabled any carrier boxes, they should add their own boxes here.
To add a new box, simply click Add Box. This will open a modal where you can enter the custom box’s name and dimensions. Please note that you should enter the box’s outer dimensions. The inner dimensions will be estimated automatically.
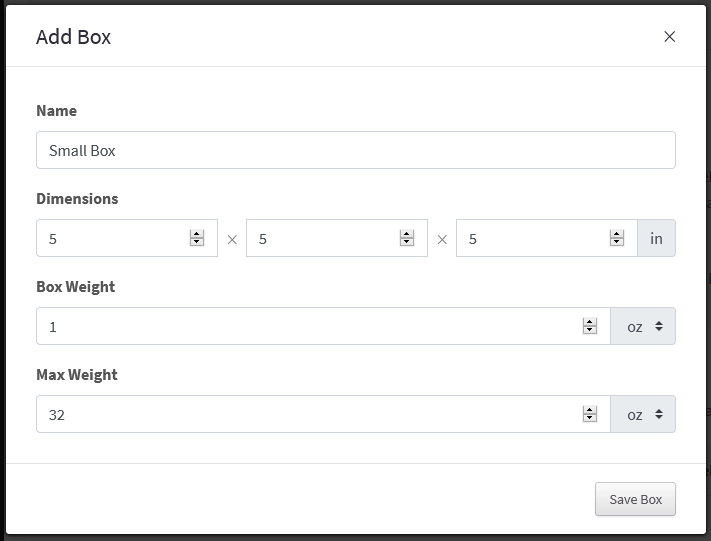
To edit or delete a box, click the pencil icon or trash icon, respectively, next to that box in the Boxes table.
Product Level Settings
None.
Flat Rate
The Flat Rate method allows vendors to set a flat shipping rate for each geographical region they ship to. Currently shipping rates can be defined for continents, countries, states, and postcodes. This shipping method is great for vendors who want to offer simple flat shipping rates and reuse those rates across multiple products.
Store Level Settings
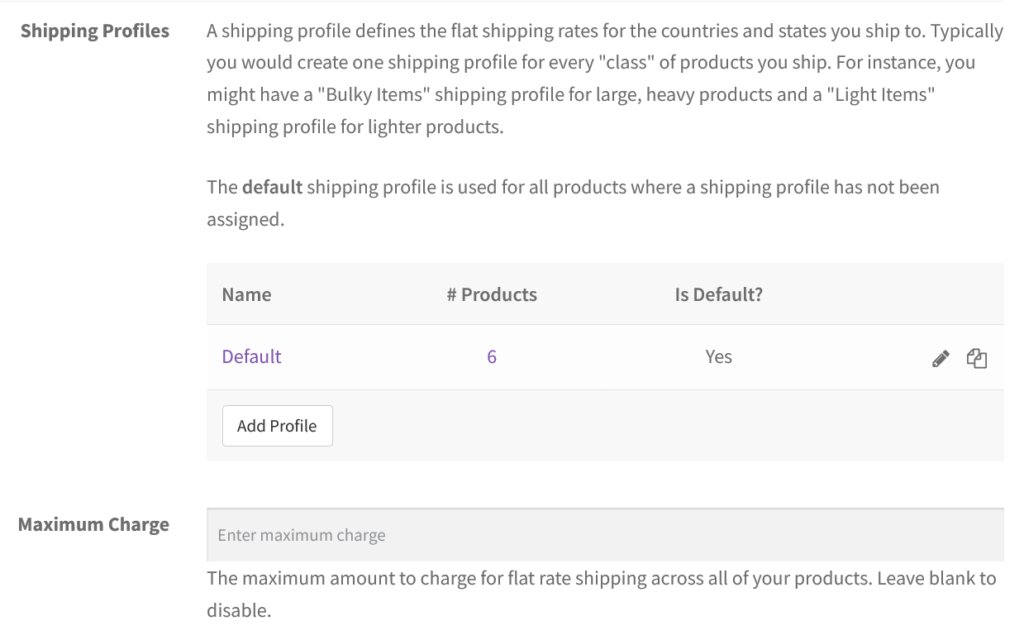
Shipping Profiles
Vendors can configure one or more flat rate Shipping Profiles at the store level. Shipping profiles are essentially a set of flat shipping rates with a name, and they provide a way for vendors to easily reuse shipping rates for items with similar shipping requirements. For example, vendors might set up a “Heavy Items” profile with flat rates for items above a certain weight and a “Standard” profile with rates for their other items.
Vendors must designate one shipping profile as their default shipping profile. The default shipping profile is used for products where another profile has not been assigned and cannot be deleted.
The default shipping profile can be changed by clicking the “star” button next to the new default profile. There are also buttons to edit, delete, and duplicate a shipping profile.
The Add Profile button opens a modal where vendors can create a new shipping profile.
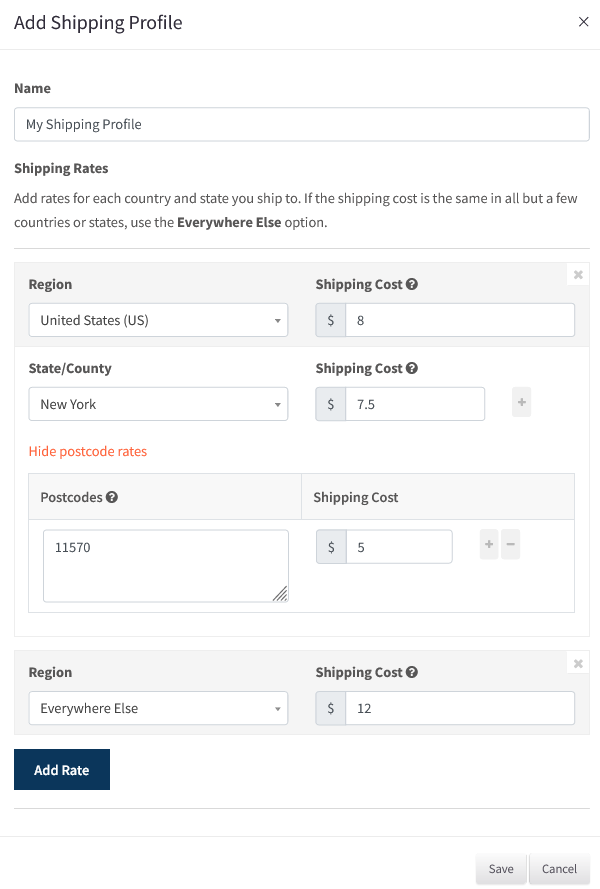
As you might guess, the Name field is where the vendor sets the name for the new shipping profile and shipping rates are entered under Shipping Rates.
Rates can be defined for continents, countries, states, and postcodes. Continental rates can be overridden for individual countries, country rates can be overridden for individual states, and state rates can be overriden for ZIP/postcodes. There’s also a handy “Everywhere Else” option that can be used when the shipping cost is the same in all but a few places.
To illustrate how flat rates are calculated, the shipping rate for a product configured to use the “My Shipping Profile” profile above would be calculated as $5 for a customer in ZIP code 11570, $7.5 for a customer with a shipping address in another ZIP code in New York, $8 for a U.S. customer outside of New York, and $12 for a customer outside of the U.S.
Maximum Charge
Allows vendors to set a maximum shipping charge. If a value is entered, a customer will never be charged more than the entered amount for flat rate shipping.
Product Level Settings
The Flat Rate method has a few product level settings as depicted in the screenshot below.
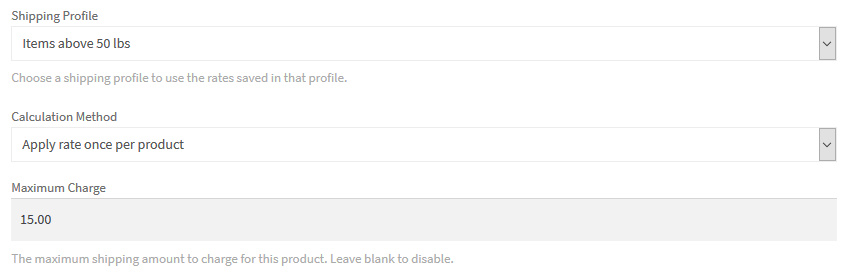
The settings are as follows:
Shipping Profile
Allows the vendor to select the shipping profile to use for the product. The shipping profile marked as the default profile on the Flat Rate shipping settings page will be selected by default.
Calculation Method
Controls how the shipping rates defined in the selected shipping profile are applied to calculate the shipping cost for the product. There are two choices:
- Apply rate once per product – When selected, the shipping rate applicable for the customer’s location will be applied only once for the product. If the shipping rate is determined to be $5 and the customer purchases 3 of the product, the customer will be charged $5 in shipping for the product.
- Apply rate once per quantity – When selected, the shipping rate applicable for the customer’s location is applied once per quantity of the product purchased. If the shipping rate is determined to be $5 and the customer purchases 3 of the product, the customer will be charged $15 in shipping for the product.
Maximum Charge
Allows vendors to set a maximum shipping charge for the product. Useful when combined with the “Apply rate once per quantity” calculation method.
Free Shipping
The Free Shipping method is very simple. When selected, shipping will not be charged for the product. It’s perfect for vendors who want to ship their products for free.
Store Level Settings
The free shipping method has a few options available at the store level as depicted below.

The options are:
- Free Shipping Requires – Allows vendors to set conditions required for free shipping. Options include:
- N/A – Free shipping is always available.
- A valid free shipping coupon.
- A minimum order amount.
- A minimum order amount OR a coupon.
- A minimum order amount AND a coupon.
- Minimum Order Amount – Sets the minimum order amount required for free shipping.
- Hide Other Shipping Rates? – This checkbox appears when Multiple Shipping Methods is turned on in the MarketShip settings. If checked, all other shipping rates will be hidden if the customer qualifies for free shipping.
Dokan Pro Shipping Methods
Product Shipping
This shipping method is available when the old Dokan Shipping method is enabled under WooCommerce > Settings > Shipping > Dokan Shipping. Its functionality and settings are identical to the old Dokan Shipping method.
Please consult the Old Dokan Shipping Method documentation for more information.
Shipping Zones
This shipping method is available when Dokan Pro is installed and the Vendor Shipping shipping method has been added to one or more WooCommerce Shipping Zones. Its functionality and settings are identical to those provided by Dokan Zone Wise Shipping.
Please consult the Dokan Zone Wise Shipping documentation for more information.
WC Vendors Pro Shipping Methods
Seller Shipping
This is simply a MarketShip compatible version of the WC Vendors Pro Shipping System. Please refer to the WC Vendors Pro documentation for details.
WCFM Marketplace Shipping Methods
Store Shipping by Zone
This is a MarketShip compatible version of the Shipping by zone shipping method from WCFM Marketplace. It is available when at least one WooCommerce shipping zone has the WCFM Store Shipping shipping method added to it.
Store Shipping by Weight
This is a MarketShip compatible version of the Shipping by weight shipping method from WCFM Marketplace. It is available when the Marketplace Shipping by Weight shipping method is enabled under WooCommerce > Settings > Shipping > Marketplace Shipping by Weight.
Store Shipping by Country
This is a MarketShip compatible version of the Shipping by country shipping method from WCFM Marketplace. It is available when the Marketplace Shipping by Country shipping method is enabled under WooCommerce > Settings > Shipping > Marketplace Shipping by Country.
Store Shipping by Distance
This is a MarketShip compatible version of the Shipping by distance shipping method from WCFM Marketplace. It is available when the Marketplace Shipping by Distance shipping method is enabled under WooCommerce > Settings > Shipping > Marketplace Shipping by Distance.
Table Rate Shipping
If you are also running our Table Rate Shipping plugin, TRS will appear as a shipping option to your vendors.
Printing Labels
When the Label Printing feature is enabled vendors can print shipping labels in multiple formats straight from the vendor dashboard. Here’s how that process works:
- Go to the Orders page in the vendor dashboard. Either select an order (Dokan and WCFM Marketplace) or hover over an order row and click the Shipping Labels link that appears (WC Vendors Pro). You will now see a list of shipping labels similar to this:

- To print a shipping label for your order:
- Click Create new label
- If this is your first time attempting to print a label you will be prompted to create or connect a Shippo account. Click “Create or connect account” and follow the on-screen instructions to complete this process.
- Enter the full address you’re shipping from, if it’s the first time printing a shipping label.

- Verify the destination address.
- Enter the weight and dimensions of the box you’re shipping. If you’re using the Live Rates shipping method you can either select from one of the boxes that was computed at checkout or enter a custom box.
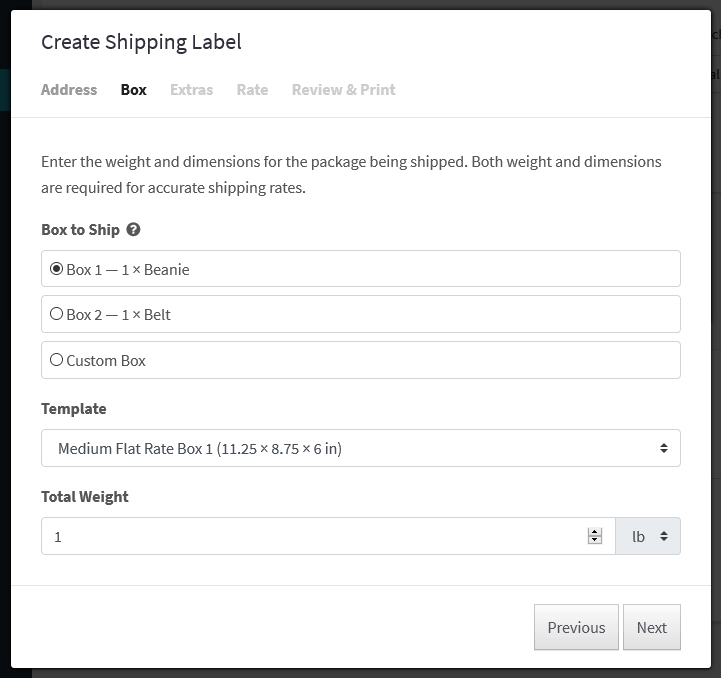
- Optionally add extras like shipping insurance.
- Select the desired shipping service/rate.
- Select label format (optional).
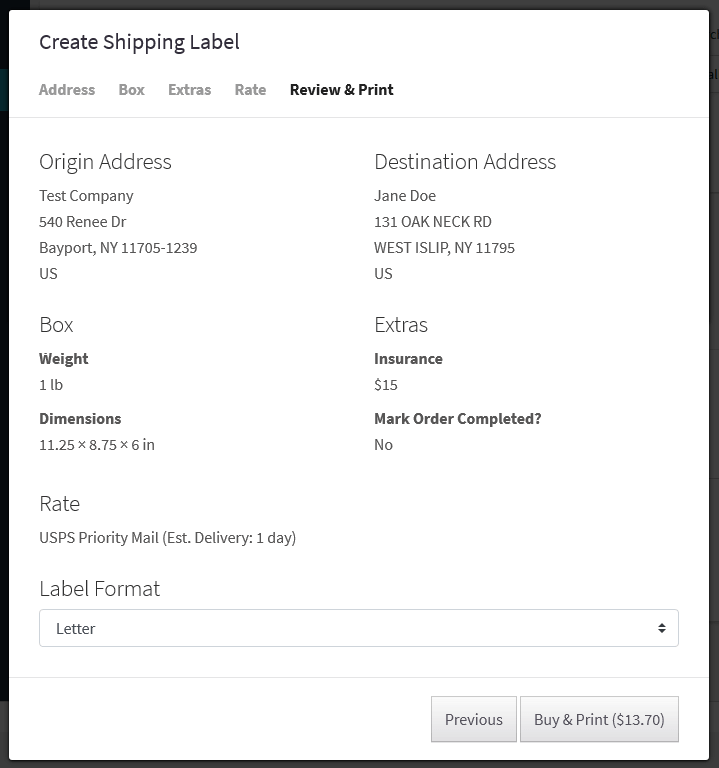
- Buy & Print
- After clicking Buy & Print, label(s) are automatically opened in a print dialog.
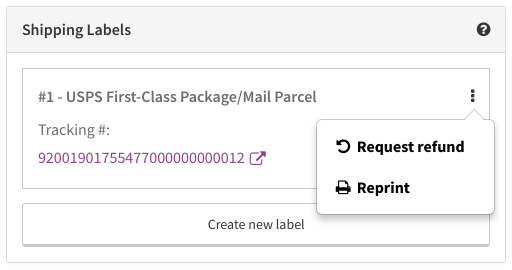
The Shipping Labels box will display the label(s) you purchased, and contains the tracking number for your shipment. The tracking number(s) will be included in the email sent to your customer when the order is marked “completed.”
![]()
You can also reprint your label or request a refund, if necessary. Click the three ellipsis menu for the label to reveal these options.
Shortcodes
MarketShip comes with a [marketship_tracking_numbers] shortcode for displaying a table of tracking numbers for an order. The shortcode has two attributes:
- order_id – Order ID (required)
- table_class – Optional CSS class for the tracking numbers table. Default: marketship-table.
For example, you could use the following shortcode to output a table of tracking numbers for order 123:
[marketship_tracking_numbers order_id="123"]
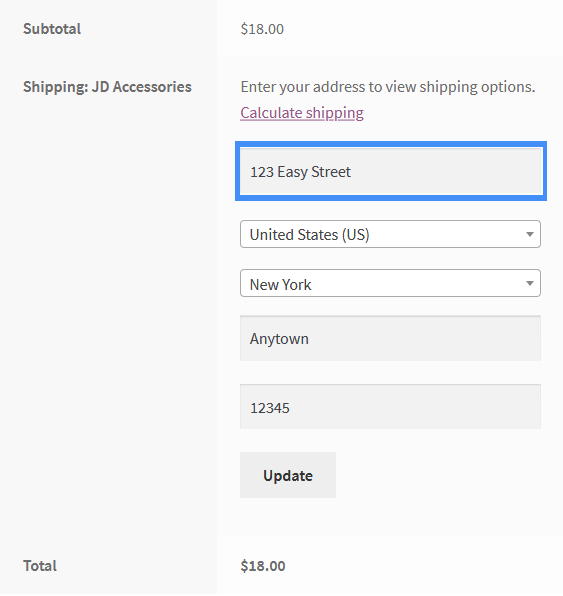
Street Address Field
Some Shippo carriers require a street address in order to calculate shipping rates (e.g. Fastway and Sendle). To best support these carriers and maximize the chances of customers getting rates on the cart page, MarketShip adds a new “Street address” field to the WooCommerce cart shipping calculator form as depicted below.
 If you would like to hide this field, you can do so by adding the following snippet to your theme’s
 functions.php file:
add_filter( 'marketship_enable_cart_calculator_field', '__return_false' );