Click here to purchase Payouts
Minimum Requirements
Payouts requires PHP 7.2+, HTTPS support (installing an SSL certificate will accomplish this) and the following plugins:
- WC Vendors 2.3.0+
- WooCommerce 6.9.0+
- WordPress 5.8+
In order to accept payments from your customers, you’ll also need a payment gateway. For the best experience, we recommend a gateway that supports refunds. The PayPal Standard gateway that ships with WooCommerce is a great option.
Prerequisite – Obtaining PayPal API Credentials
Payouts requires valid PayPal REST API credentials to function. If you don’t have credentials already, this video will guide you through the process of obtaining them.
Enabling Live Payout Transactions
One you have created your PayPal Developer account, you will need to enable Live payouts. This step does not need to be completed in order to send payouts in Test mode, but before you can process any live payouts, you will need to have this option enabled. Keep in mind that this process is not instant. Once you click “Enable,” it can take up to 48 hours for approval.
To enable live payouts:
- Log into your developer.paypal.com account.
- Navigate to your Dashboard.
- Click My Account on the left hand menu.
- Find Payouts on the list of PayPal products, and click Enable.
 5. You will be presented with a short questionnaire. Simply fill that out and submit it. PayPal will then contact you when you have been approved.
Installing Payouts
To install Payouts:
- Log into your WordPress site.
- Go to Plugins > Add New.
- At the top of the screen, click Upload Plugin.
- Select the .zip file sent to you in your Purchase Confirmation email. You have two options:
- Click Browse. Find and select the plugin .zip file.
- Drag and drop the .zip file onto the Upload Plugin screen.*
- Click Install Now.
- When the installation completes, click Activate.
* Drag and drop will only work if your browser supports it!
Activating Your License
To benefit from future updates to Payouts, you must activate your license key. To do so:
- Log into your WordPress site.
- Go to Plugins.
- Find the row for WCV Payouts.
- Click activate license.
- Enter your license key, which was delivered along with your download.
- Click Activate.

Admin Settings
This section will walk you through the settings available for Payouts. To get started, find the WCV Payouts row on the Plugins screen and click Settings.
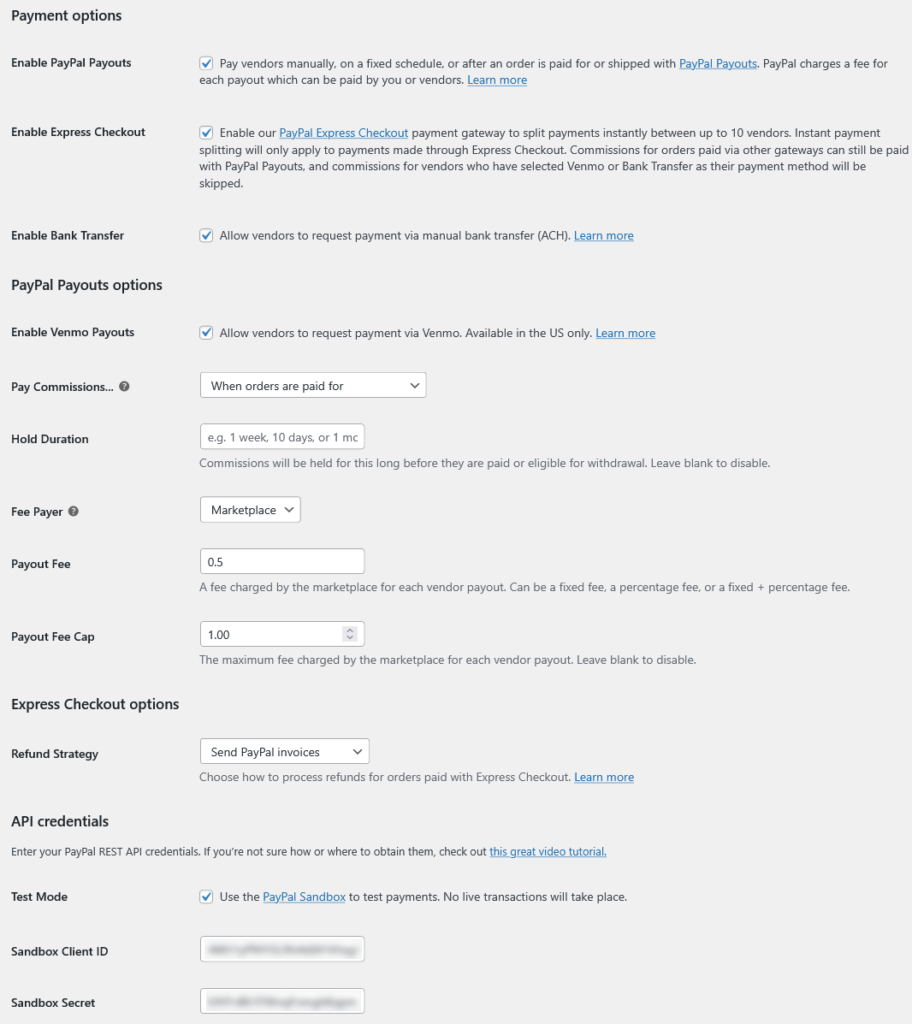
Payment Options
Enable PayPal Payouts
Check this box to enable the PayPal Payouts payment method. When enabled you can send commission payments manually, on a schedule, or after an order is paid for or shipped with PayPal Payouts.
Enable Express Checkout
Check this box to enable the Express Checkout payment method introduced in Payouts 3.0.
Enable Bank Transfer
Check this box to enable the Bank Transfer payment method introduced in Payouts 2.0.
PayPal Payouts Options
Enable Venmo Payouts
Check this box to enable the Venmo payment method introduced in Payouts 2.1. When enabled, vendors will have the option to send their payouts to any valid US mobile number with Venmo.
Pay Commissions
Choose how and when to pay commissions. There are four options available:
- On a fixed schedule – Pay all due commissions on a daily, weekly, bi-weekly, or monthly basis.
- Manually – Pay commissions on your own schedule.
- When orders are marked as shipped – Pay a vendor’s commissions when they mark their part of an order as shipped.
- When orders are paid for – Pay vendor commissions when payment for an order is received.
- When requested by vendor – Pay a vendor’s commissions when they request payment in the vendor dashboard.
Payment Schedule
This option appears when Pay Commissions… is set to On a fixed schedule. It determines how often commission payments are sent:
- Monthly – Pay due commissions once monthly, starting on the first of next month.
- Bi-weekly – Pay due commissions every other week on the last day of the week.
- Weekly – Pay due commissions every week on the last day of the week.
- Daily – Pay due commissions once daily at the end of the day.
Minimum Payout
This option appears when Pay Commissions… is set to When requested by vendor. It determines the minimum balance a vendor must have in order to request a payout. Set to 0 or leave blank to disable.
Hold Duration
This option appears when Pay Commissions… is set to When orders are marked as shipped, When orders are paid for, or When requested by vendor. Examples of valid values include “1 month,” “2 weeks,” and “3 days.”
If you’re sending payouts when orders are marked as shipped or paid for, this controls how long payouts are delayed after an order is shipped or payment is received. If you enter “30 days”, payouts created for orders shipped today will be paid in 30 days.
If you’re sending payouts on request, this controls how long it takes commissions to become eligible for withdrawal. If you enter “2 weeks” here, a vendor will not be able to request payout of their commissions until they are at least 2 weeks old.
Fee Payer
Choose who pays the PayPal fees on each payout. There are two options:
- Marketplace – The marketplace pays the PayPal fees.
- Vendor – The vendor pays the PayPal fees; the projected fees are deducted from the amount sent to the vendor.
Payout Fee
Use this option to charge vendors an extra fee for each payout. You can enter a fixed fee, a percentage fee, or a fixed + percentage fee. Examples of valid values include “0.25,” “2.5% + 0.25”, and “2.5%.” If you don’t want to charge a payout fee, simply leave this field blank.
Payout Fee Cap
This option controls the maximum fee charged by the marketplace for each vendor payout. This applies strictly to fees levied by the marketplace (see Payout Fee above) and does not apply to any fees charged to the vendor by PayPal.
Express Checkout Options
Refund Strategy
Controls how refunds are processed for orders paid via the PayPal Express Checkout payment gateway. Please refer to Refund Strategies for details.
API Credentials
Test Mode
Check this box to enable test mode. In test mode, all payouts are sent in the PayPal Sandbox; no live payments will be processed.
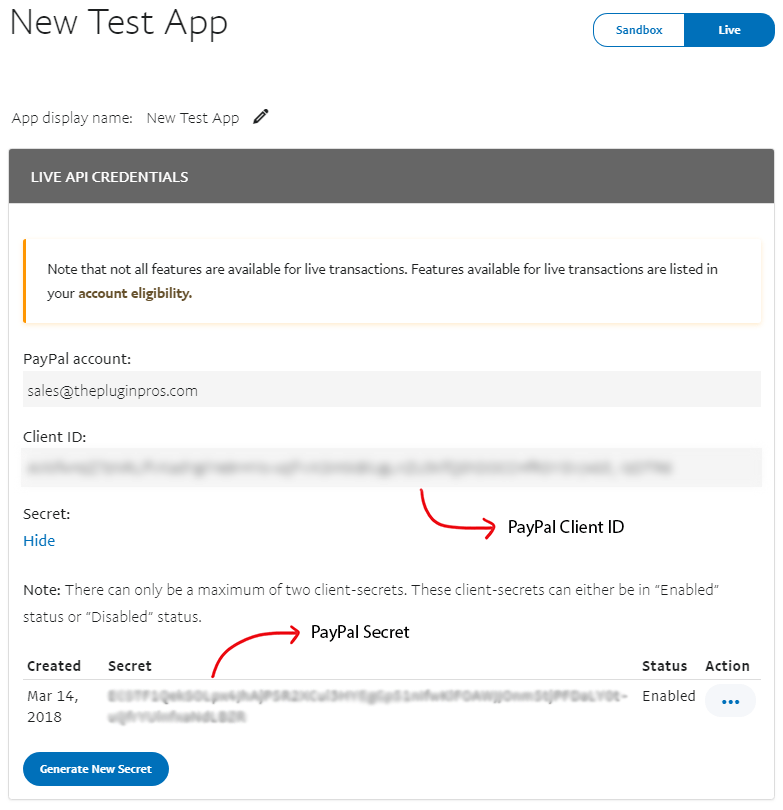
Live Client ID
This option appears when Test Mode is disabled. You should enter the Client ID listed under Live API Credentials when you edit your PayPal application.
Live Secret
This option appears when Test Mode is disabled. You should enter the Secret listed under Live API Credentials when you edit your PayPal application.
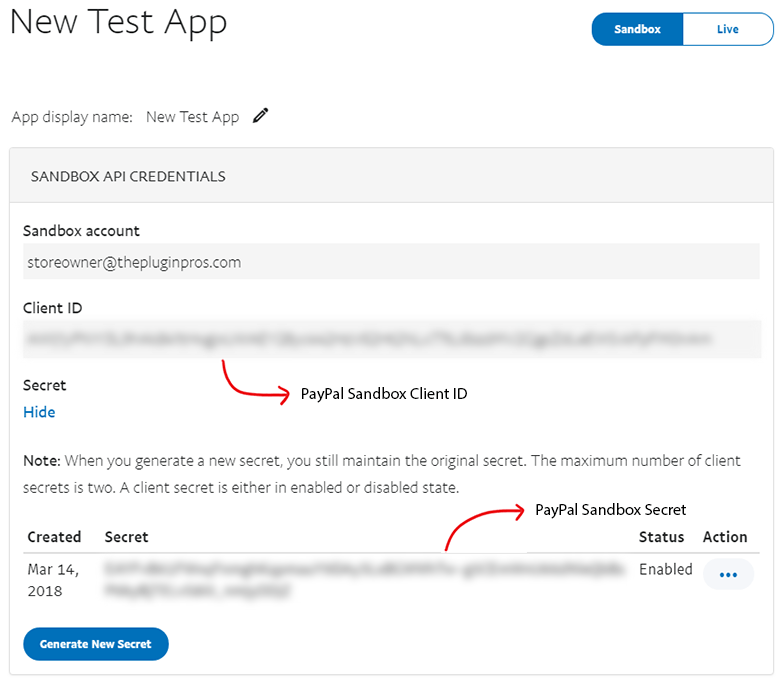
Sandbox Client ID
This option appears when Test Mode is enabled. You should enter the Client ID listed under Sandbox API Credentials when you edit your PayPal application.
Sandbox Secret
This option appears when Test Mode is enabled. You should enter the Secret listed under Sandbox API Credentials when you edit your PayPal application.
Managing Payouts
Payouts are created in one of three ways. The Type of a payout indicates how it was created:
- Manual – Created manually by an Admin.
- Scheduled – Created as part of a regular scheduled payment.
- Event Based – Created when an order was marked as shipped or paid for.
Each payout is assigned a unique ID at the time it is created. In addition, a Batch ID is assigned when the payout is submitted to PayPal for processing.
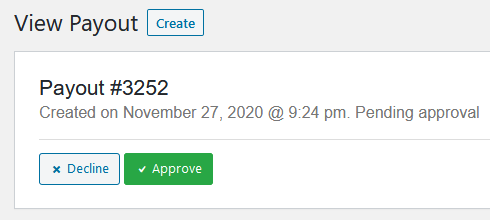
A payout also has a Status. The status reflects the progress of the payout and ranges from Pending Approval to Complete. The following payout statuses are used:
- Pending Approval – Created, but not posted to PayPal – admin approval is required.
- Scheduled – Scheduled for a future date – no further action is required.
- Pending – Posted to PayPal and awaiting processing.
- Processing – Payout is being processed by PayPal.
- Complete – Payout completed successfully – no further action is required.
- Canceled – Canceled by PayPal – see payout notes for more information.
- Denied – Denied by PayPal – see payout notes for more information.
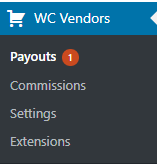
Viewing Payouts
As payouts are created, the Payouts page will start to fill up. You can find this page under WC Vendors > Payouts (WC Vendors 2.0+) or WooCommerce > Payouts (WC Vendors 1.9.14).
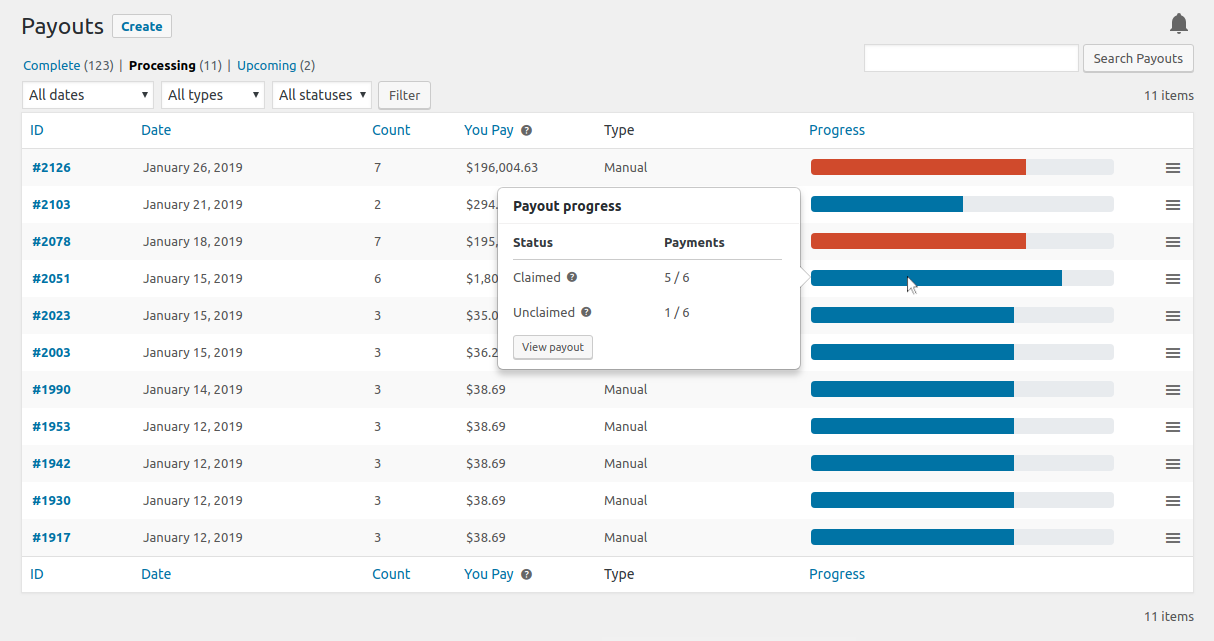
Each row displays details about a single payout, including its ID, the date it was created, the number of payments in the payout, the amount you will pay from your PayPal balance, and the payout’s progress.
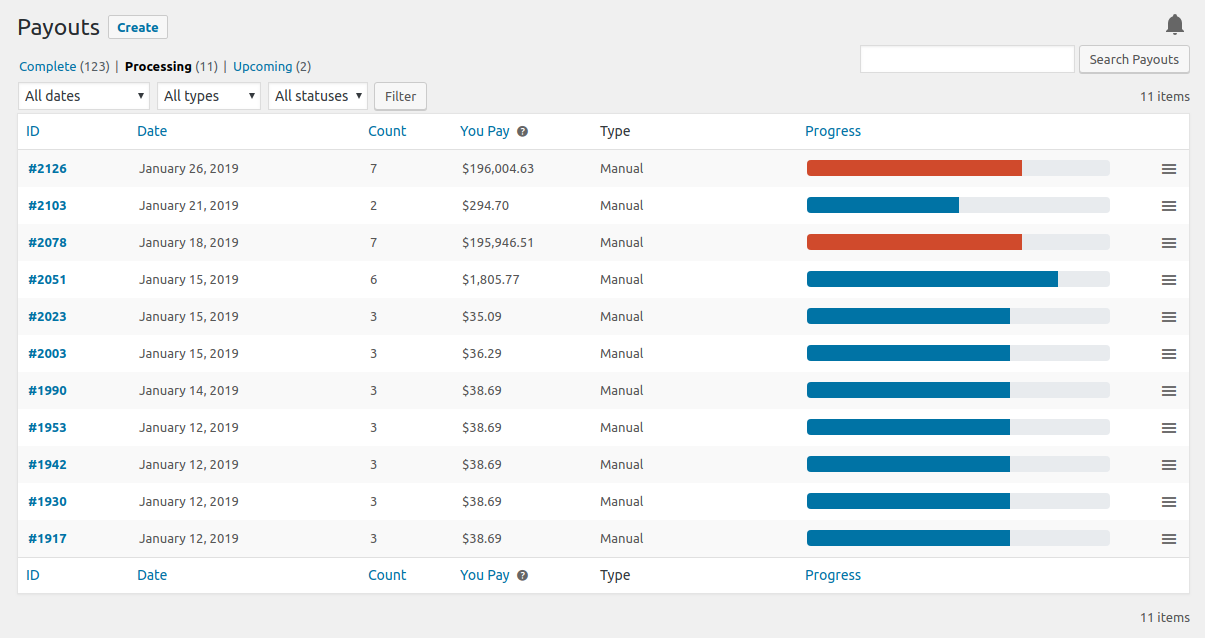
Payouts with failed, blocked, returned, or denied payments are highlighted in orange so you can quickly identify them. Hovering a payout’s progress bar reveals details about the progress of the payout.
You can Filter payouts by Date (month/year), Type, and Status.
![]()
If a payout is Pending Approval, you can choose to Approve or Decline it from the payouts list table.
![]()
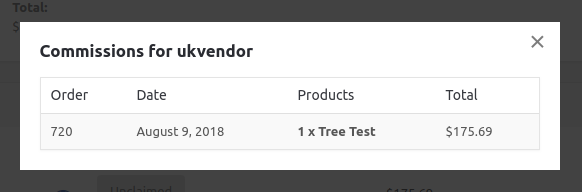
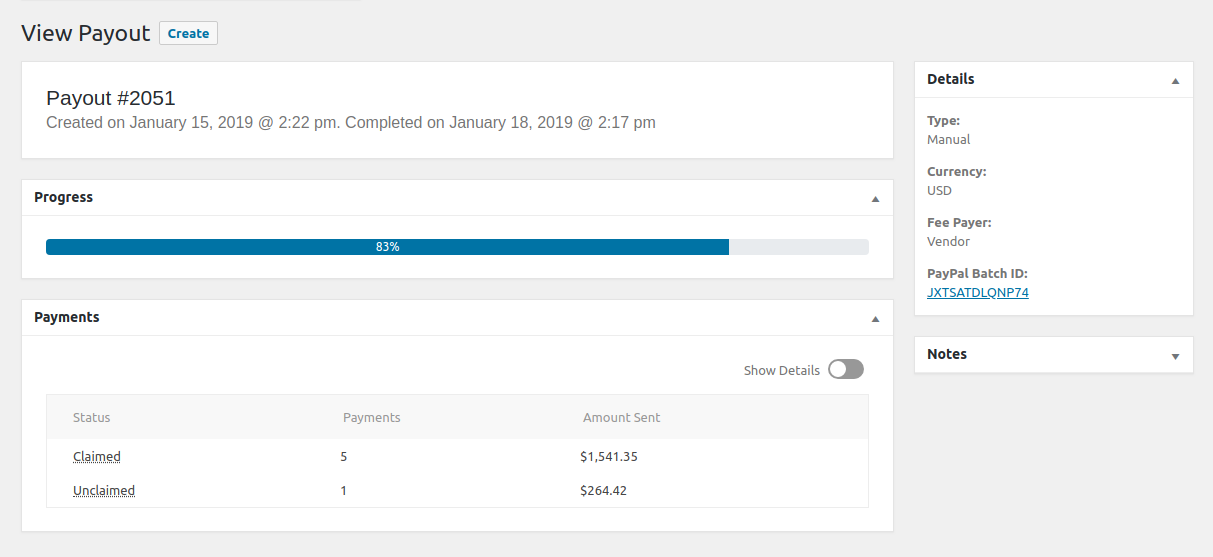
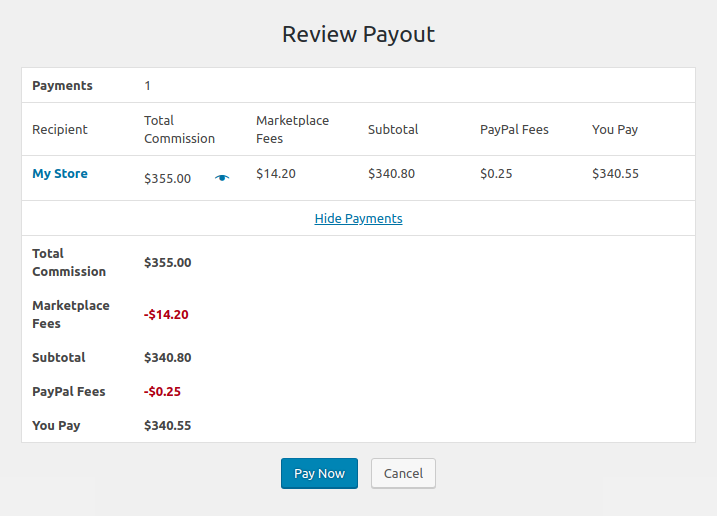
Clicking the payout ID or the list icon will open the payout details screen. This screen shows the payments included in the payout and the commission totals paid to each vendor.

By clicking the “eye” icon in the Total Commission column, you can view the orders and items comprising the vendor payout.
To get a high level overview of the status of the payout, you can toggle the Show Details option off.
As payouts are processed, issues may arise. For example, some payments might be blocked or denied by PayPal, or returned after they go unclaimed by the recipient. In order to help you catch these issues, Payouts includes a Notifications system.
You can view unread notifications from the Payouts screen by clicking on the bell icon.
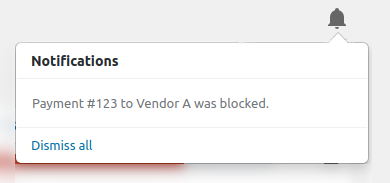
Clicking on the notification text will open the relevant payout. You can dismiss a single notification by hovering over it and clicking the X icon. Alternatively, you can Dismiss all unread notifications at once.
The number of unread notifications is displayed next to the Payouts menu item so you can quickly determine whether there are issues that need your attention.
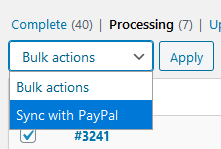
Synchronizing Payouts
Occasionally, you may find that a payout’s status is not updated in WordPress after its status changes in PayPal. This typically happens when the webhooks Payouts uses to keep payout statuses in sync fail to reach your site, or when webhook processing fails for other reasons.
If you know that the status of a processing payout is wrong, you can force Payouts to resynchronize it with PayPal and fix its status by clicking the Sync with PayPal button on the View Payout screen.

You can also sync multiple payouts from the Processing view under WC Vendors > Payouts using the Sync with PayPal bulk action.
Managing Payout Requests
If you have the Pay Commissions… setting set to When requested by vendor, your vendors will be able to request a payout from the vendor dashboard. Payout requests will appear just like normal Payouts under the WC Vendors > Payouts > Pending Approval tab.

You can Approve or Deny a payout request using the buttons in the Payouts list table or from the View Payout screen.
When you deny a payout request, you’ll be prompted to provide a reason. This is optional, but we suggest that you provide one so your vendor clearly understands why their payout was denied.
Email Notifications
Payouts sends email notifications to the admin when a new payout request is received and to the vendor when their payout request is approved or denied. You can manage these notifications under WooCommerce > Settings > Emails.

Creating a Payout Manually
You can create a Manual payout using one of four methods:
Method 1: Create Payout Page
- Go to WC Vendors > Payouts (WC Vendors 2.0+) or WooCommerce > Payouts (WC Vendors 1.9.14).
- Click Create at the top of the page. The Create Payout page will open.
- Select the commissions you wish to pay.
- Click Create.
Method 2: Commissions Page
- Go to WC Vendors > Commissions (WC Vendors 2.0+) or WooCommerce > Commissions (WC Vendors 1.9.14).
- Check one or more due commissions.
- Select Pay with Payouts from the Bulk Actions menu.
- Click Apply.
Method 3: Users Page
To get started, go to Users > All Users. From there, you will have the option to pay Multiple Vendors or a Single Vendor.
Pay Multiple Vendors
- Check one or more vendors with due commissions.
- Select Pay due commissions from the Bulk Actions menu.
- Click Apply.
Pay a Single Vendor
- Hover the vendor you want to pay.
- Click Pay commissions.

Method 4: Orders Page
- Go to WooCommerce > Orders.
- Check one or more orders with due commissions.
- Select Pay due commissions from the Bulk Actions menu.
- Click Apply.
After creating a payout, you will be directed to the Payout Review page. Here, you can review the details of the payout before submitting it to PayPal for processing.
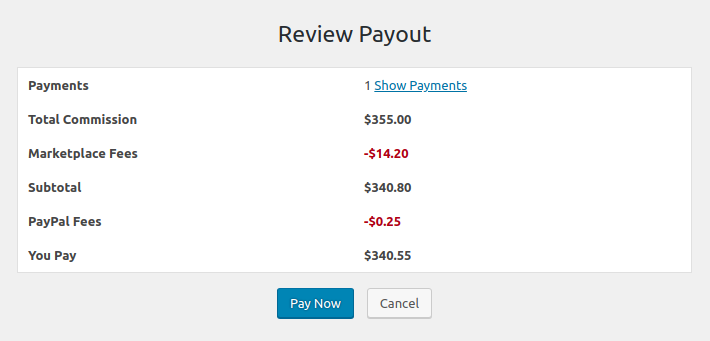
Clicking Show Payments reveals a table with details about the individual payments that will be made as part of the payout. Generally, there will be one payment per vendor being paid.
Click Pay Now to submit the payout to PayPal, or Cancel to delete it and return to the previous page.
Handling Refunds
Payouts implements a cooperative refund process to help recover refunded commissions from vendors. The process kicks in when you use the Refund button to fully or partially refund an order.

The Cooperative Refund Process
To initiate a cooperative refund:
- Go to the Single Order page.
- Click Refund.
- Input the quantity of each item to be returned, as well as any additional fees that may have been charged.
- Click Refund manually or Refund via Payment Gateway.
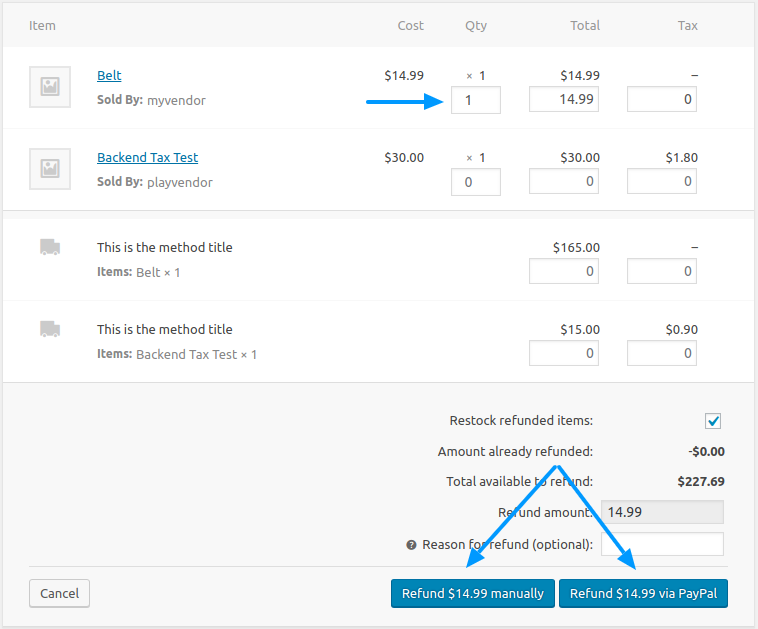
If the commissions for the refunded item(s) have not been paid, the refund will be processed immediately. Otherwise, Payouts will delay processing of the refund until all paid commissions have been returned.
Here’s what happens behind the scenes:
- Invoices are sent to each respective vendor for commissions paid on refunded items.
- The customer receives an email indicating that their refund is processing.
- If the order was fully refunded, its status is changed to Pending refund.
- After all vendors have paid their invoices, the refund is processed automatically via your payment gateway*. If the order was fully refunded, its status is changed to Refunded.
* If you processed the refund manually, you will be responsible for processing the refund via your payment gateway.
Managing Refunds
Cooperative refunds can be managed from the Single Order page, just like normal WooCommerce refunds.

The Status Labels beneath the refund details summarize the status of the cooperative refund. Hovering them reveals more detailed information.
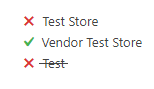
A list of vendors who were invoiced is displayed under Invoices Paid. Vendors who have paid their invoices are marked with a green check, and those who haven’t a red x. Canceled invoices are indicated with strikethrough text.
Click Process now to process the refund via your payment gateway immediately, or Cancel unpaid invoices to cancel all unpaid invoices.
Vendor Dashboard
Payouts adds a new Commissions page to both the frontend and backend vendor dashboards, enabling your vendors to view a listing of their commissions and PayPal payouts.
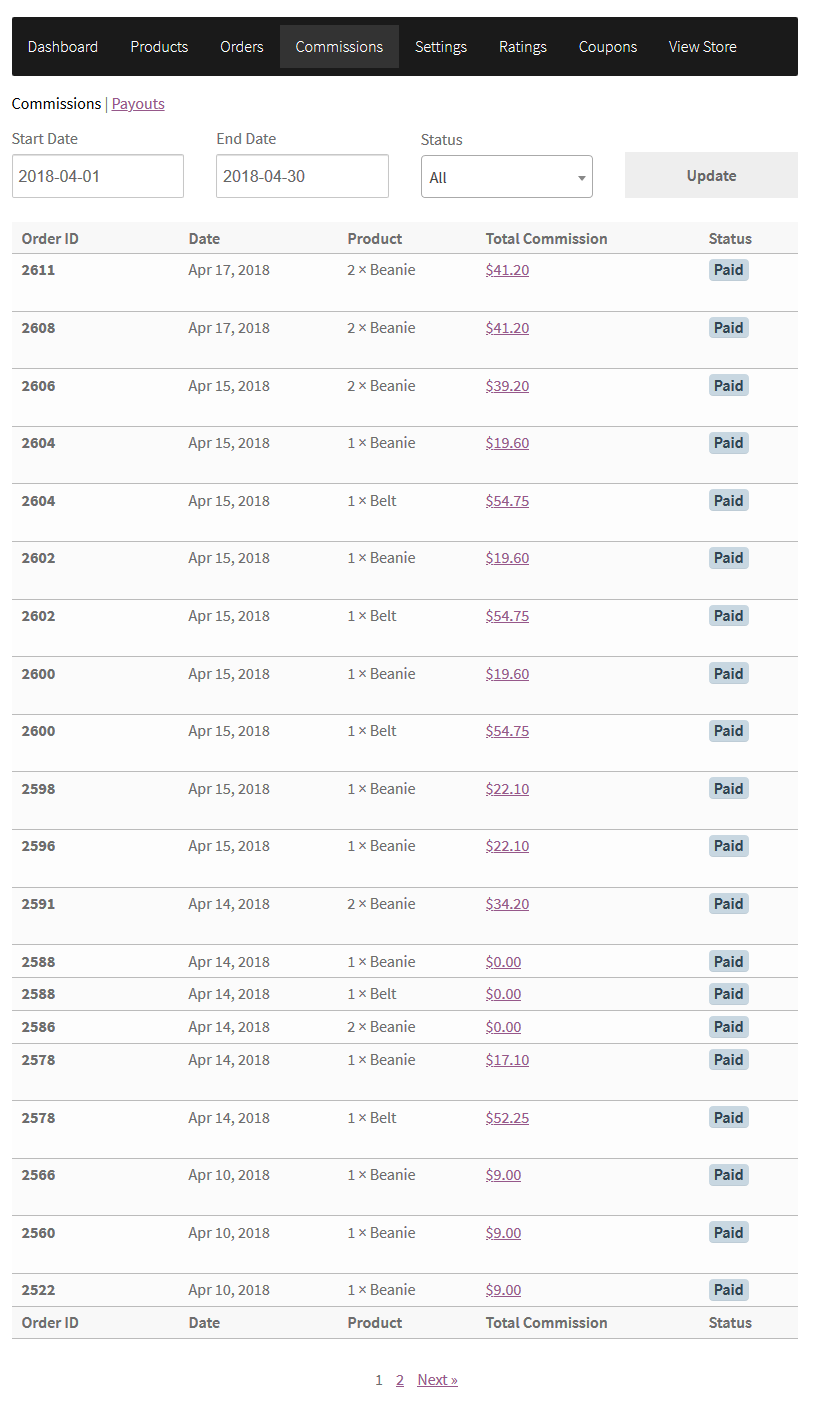
The Commissions page is designed from the ground up to display properly on mobile devices, so your vendors can easily check up on their shop financials when on the go.
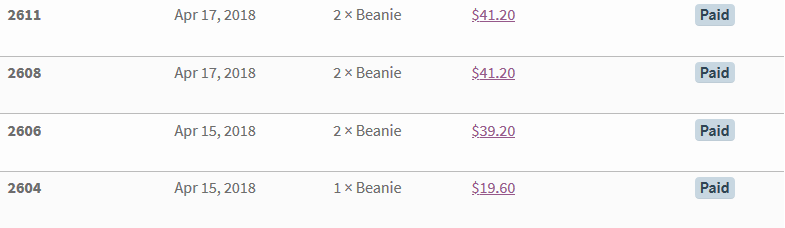
In the Commissions view, hovering over a paid commission will reveal a link to the associated PayPal Payout if the commission was paid via PayPal. In addition, clicking the value in the Total Commission column will open a popover with a breakdown of the commission amount.
In the Payouts view, hovering over a payout will reveal a link to the payout details.

Requesting a Payout
When Pay Commissions… is set to When requested by vendor, a new notice is displayed on the Commissions page in the vendor dashboard. If the vendor already has a pending payout request, it shows the amount and date of the request and an option to cancel it. Otherwise, it shows the vendor’s available balance and a button to request a payout. Examples of what the notice looks like in both scenarios are included below.
Example – Vendor does not have pending payout request
 Example – Vendor has pending payout request
 The UI is built to be simple and intuitive: To request a payout, the vendor just needs to click the Request Payout button, and clicking Cancel Payout cancels a pending payout request. If the vendor’s balance is below the minimum payout amount entered on the Payouts settings page, the Request Payout button is disabled and a tooltip appears when it’s hovered to explain why.